
Jumping into the Optimism world and looking to move some funds over? The path you pick can indeed make or break your experience in terms of cost. Multiple methods are at your disposal, but making the right choice could save you a pretty penny!
In this guide, I'll walk you through three tried-and-tested methods I've personally employed numerous times to transfer funds to Optimism (and, in fact, to any Layer 2). My focus? Guide you towards methods that are not only secure but also cost-efficient and straightforward.
ℹ️ You can complete this process on both mobile and desktop, but I'll demonstrate using a desktop. For a comprehensive list of suitable wallets, take a look at this curated list of wallets
Method 1: Transfer from a Centralized Exchange
One of the simplest methods to move funds to Optimism is by purchasing ETH on a centralized exchange that supports the Optimism network, then directly withdrawing them to your wallet.
However, a word of caution: currently, only a handful of centralized exchanges offer direct transfers to the Optimism network. That said, as Optimism continues to gain traction, expect this support to increase over time.
1. Purchase ETH on a Centralized Exchange
Before anything else, ensure that your chosen centralized exchange supports the Optimism Network.
ℹ️ For ease of reference, Optimism has kindly compiled a list of exchanges that do support their network. You can view this list here.
As of this writing, platforms like Binance, Coinbase, Crypto.com, Kucoin, Huobi, Gate.io, and Bybit allow you to buy and bridge ETH to Optimism (OP Mainnet). However, my go-to exchange, Kraken, has yet to support this method.
Using Coinbase as our illustration:
- Log In or Sign Up: If you're new to Coinbase, sign up or download the Coinbase app. If you already have an account, simply log in.
- Navigate to Purchase:
- On the website: Go to "Buy & Sell."
- On the mobile app: Tap the (+) Buy button on the Home tab.
- Select Ethereum (ETH):
- On the website: Use the Buy panel to search for and select Ethereum.
- On the mobile app: Type "Ethereum" in the search bar. Once Ethereum appears in the results, tap it.
- Enter Purchase Amount: Input the desired amount in your local currency. The system will automatically provide the equivalent ETH amount.
- Preview & Confirm: Tap "Preview buy" to review the details. Once satisfied, confirm by selecting "Buy now."
- Completion: After the order is processed, a confirmation screen will appear. Congratulations, you've successfully purchased ETH!
The procedure remains largely straightforward across other exchanges as well.
2. Transferring Funds to Your Optimism Wallet
- Start the Transfer Process: Click on "Send & Receive".

- Specify Amount and Address: Enter the desired amount and input your wallet address on Optimism.

- Select the Network: From the Ethereum network options, choose "Optimism".
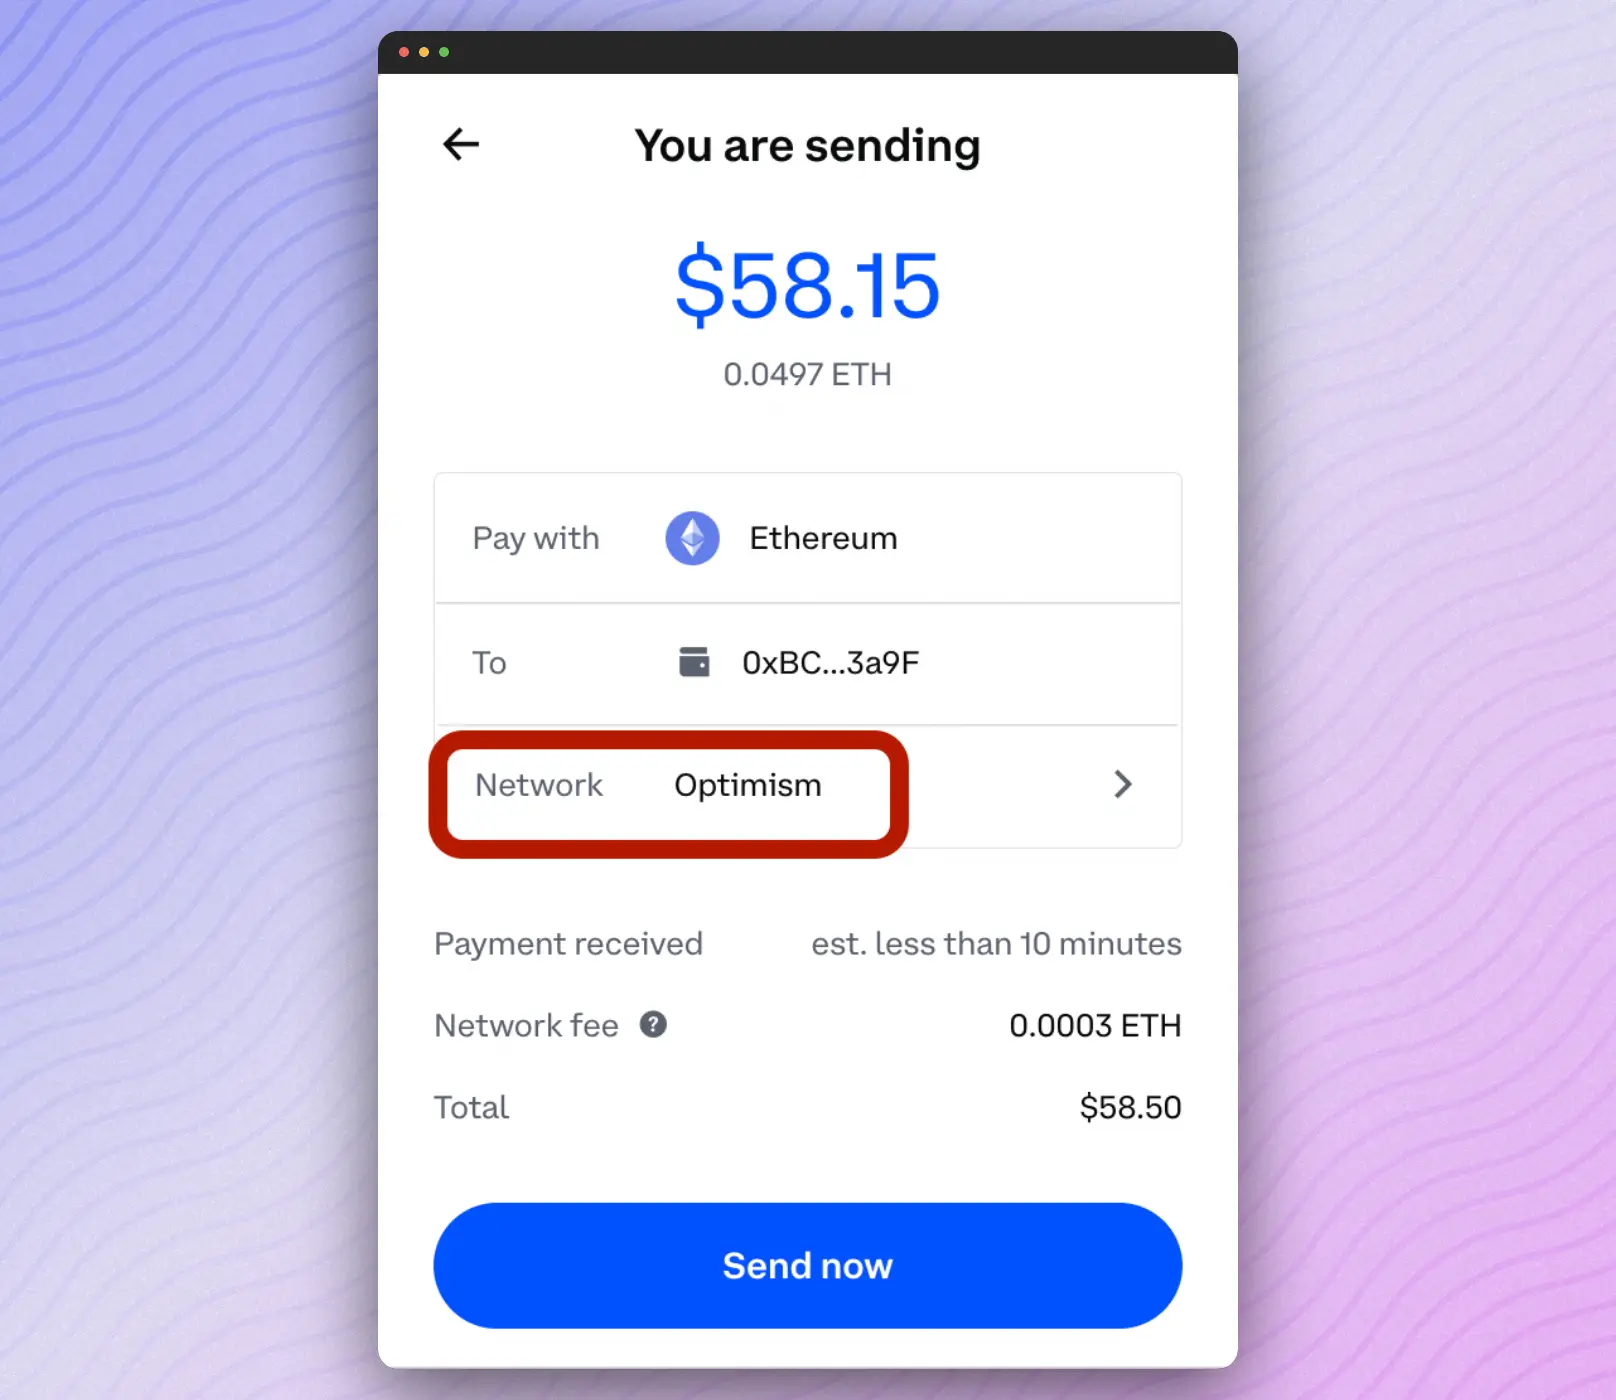
- Confirm the Transfer: Click on "Send now".
And there you have it! You're all set to delve into what the Optimism ecosystem has to offer.
⚠️ Beware of Scams & Address Errors!
Always triple-check that you're sending your ETH to the correct address. Ensure it's an Ethereum-compatible address. Avoid entering addresses from other blockchains like Bitcoin or Solana; doing so could result in a permanent loss of your funds.
Method 2: Use a fiat-on-ramping solution
Looking for another straightforward way to top up your Optimism wallet? Consider using a fiat on-ramping solution. It's a direct bridge from traditional currency to crypto.
Optimism has kindly curated a list for us, featuring trusted on-ramping providers such as Ramp, MoonPay, and Transak. Dive into their full recommendations here.
For a detailed, step-by-step walkthrough on using Ramp with Optimism, check out this handy guide: Optimism's Ramp Guide.
Many wallet providers, for convenience, have integrated these services directly. Using MetaMask as an example:
- Access Your Wallet: Log into MetaMask and switch to the Optimism (OP mainnet) network.
- Initiate Purchase: Click on 'Buy'.
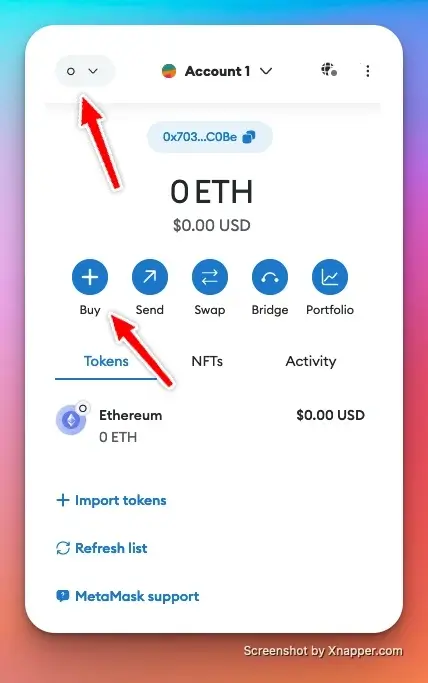
- Specify Details: Choose your country and currency, then decide on the amount you want to buy.
- Select Token and Network: Ensure you're purchasing ETH and that it's set for the Optimism network.
- Pick a Payment Method: Choose one that's available in your region.
- Choose a Provider: Once you've selected a provider, simply follow their given steps.

Method 3: Bridge your funds from another network
If you already have funds on networks like Ethereum, Arbitrum, or Polygon, you can seamlessly bridge them over to the Optimism Mainnet (OP Mainnet). It's like moving money between bank accounts but in the crypto world.
1. Ensure Your Wallet Has Funds
Before proceeding, confirm your wallet has some ETH. If not, you've got a couple of quick options:
- Transfer from a centralized exchange, as previously discussed.
- Use a fiat on-ramp like MoonPay pr Ramp.
2. Pick your Preferred bridge
Next, you'll need a cross-chain bridge — essentially a tool that lets you deposit funds on one blockchain and take them out on another. Your choice of bridge depends on where your funds are:
- From Ethereum? The official bridge might be your best bet.
- Transferring from another L2? You'll need to explore third-party bridges, as the official one won't suffice.
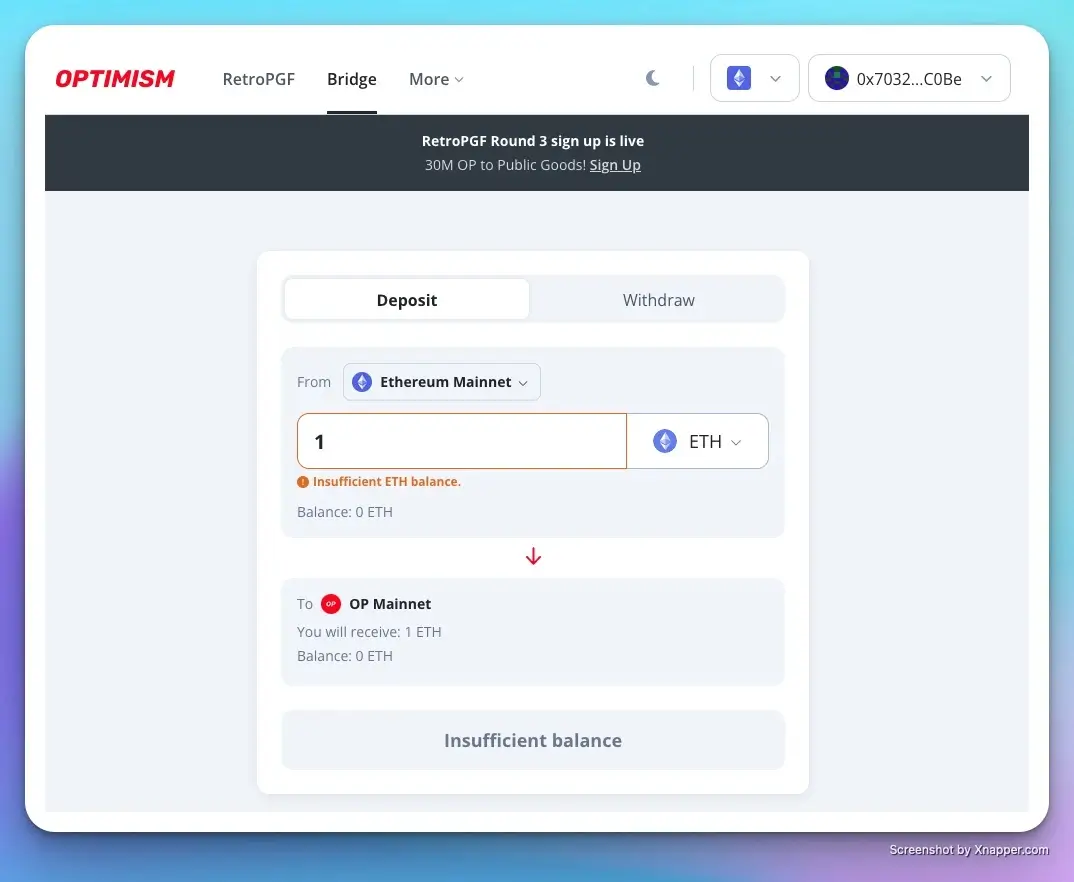
3. Move your assets to OP Mainnet
While I'm showcasing the process using Orbiter, remember there's a wide array of great alternatives like Hop, LI.FI, Synapse, Connext, and more.
Want a comprehensive list of cross-chain bridges?
👉 Head over to our list of Cross-Chain Bridges!
Step-by-Step:
- Connect Your Wallet: Begin by connecting your wallet to Orbiter finance.

- Choose Your Token: For this guide, we'll go with ETH. Remember, you'll need ETH for transaction fees on OP Mainnet.
- Select Networks: Decide which network you're sending funds from and ensure you're receiving on Optimism.
- Initiate Transfer: Hit 'send', double-check all details, and you're set!

4. Getting Your Assets Off OP Mainnet
Withdrawing from OP Mainnet is as easy as depositing:
- Find a Bridge: Head back to a bridge, like Orbiter or another one you trust.
- Connect Your Wallet: Just like before, get your wallet connected to the platform.
- Select Token & Network: Pick the token you're moving out and determine the receiving network.
- Finalize the Transfer: Click to send, patiently wait a bit, and soon enough, your funds will be on your chosen network!
Simple, right? Safe travels with your tokens!
Wrapping up
So there you have it, three straightforward paths to get your ETH onto Optimism.
Wondering what's next on the journey? Dive into our handy guide highlighting 8 must-try apps on Optimism.
And here's a bonus tip: Socket is a fantastic explorer that logs all your cross-chain actions, giving you a unified glance at all your bridge moves. Explore, have fun, and stay safe in the ever-evolving world of web3!

Article by
Maxime ServaisI'm a Software Developer and Tech Writer over at Ethereum Ecosystem. Basically, I make sure everything we cook up is top-notch and awesome!